Find out how to change garage door springs without risking injury. Our expert guide includes tools, warnings, and safe replacement steps.
Without garage door springs, lifting your garage door would be difficult. These components balance the door’s weight, making everyday operation easy and efficient.
Many homeowners consider changing garage door springs themselves to save time and money. However, it’s essential to recognize the risks involved. Spring tension is extremely high, and improper handling can result in serious injury. Understanding the process, using the correct tools, and following safety protocols are essential.
This guide outlines how to change garage door springs at home responsibly, focusing on safety, preparation, and knowing when to call a professional.
Types of Garage Door Springs
1. Torsion Springs
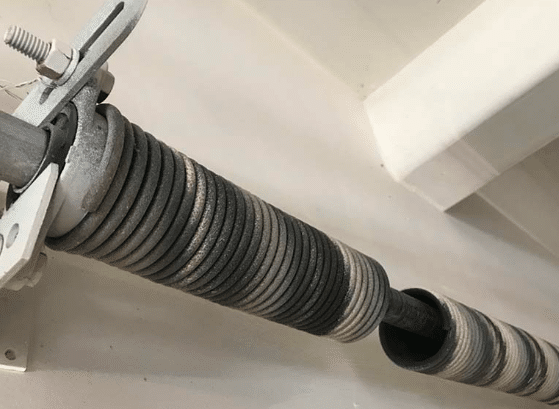
- Location: Mounted horizontally above the garage door opening on a metal shaft.
- How They Work: Torsion springs store energy by winding tightly when the door is closed. As the door opens, the spring unwinds, transferring torque through the shaft to lift the door smoothly.
- Key Features:
- Typically last 15,000–20,000 cycles (a cycle = one open and one close).
- Provide more balanced, controlled lifting compared to extension springs.
- Common in newer garage door systems due to superior durability and performance.
- Available in single or multiple-spring configurations depending on door size and weight.
- Typically last 15,000–20,000 cycles (a cycle = one open and one close).
2. Extension Springs
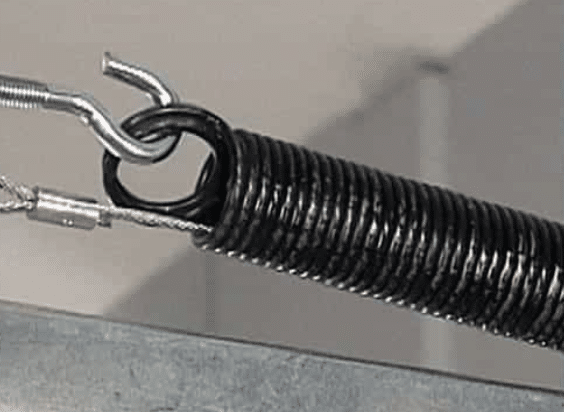
- Location: Mounted on either side of the door, parallel to the horizontal tracks.
- How They Work: These springs stretch and build tension as the door closes. When the door opens, the tension releases to help lift it.
- Key Features:
- Usually found in older or budget-friendly systems.
- Safety cables are required to prevent injury if a spring breaks under tension.
- Have a shorter lifespan—typically 5,000–10,000 cycles.
- Can be more prone to uneven lifting if one spring wears out faster than the other.
- Usually found in older or budget-friendly systems.
Why It Matters
Identifying your spring type is important because repair and replacement methods differ significantly:
- Torsion spring work is more precise and should only be handled by trained professionals due to the high torque.
- Extension spring systems are less complex but pose safety risks if not properly restrained with cables.
Tools You’ll Need to Change Garage Door Springs
Before starting, make sure you have the following tools on hand:
- Winding bars (for torsion springs only)
- Locking pliers or C-clamps
- Adjustable wrench
- Socket wrench set
- Safety goggles and gloves
- Ladder
- Tape measure
- Marker or chalk
Only use tools designed for spring adjustment—never improvise.
Safety Warnings Before You Begin
Garage door springs are under extreme tension, and improper handling can result in serious injury or damage. Whether you’re inspecting, adjusting, or replacing components, follow these essential safety precautions:
1. Never Attempt to Change Springs Alone
Always have a second person nearby for support, especially when handling heavy components or in an emergency.
- A second set of hands can help stabilize ladders, pass tools, or call for help if needed.
2. Disconnect the Garage Door Opener

Unplug the opener or disconnect it from its power source before working on any part of the garage door system.
- This prevents accidental activation during maintenance.
- Also, consider locking the wall console to prevent remote operation during work.
3. Release Tension Slowly and Carefully
Use the correct tools (winding bars) to gradually release tension when working with torsion springs.
- Sudden releases can cause springs to snap or tools to fly.
- Keep a firm grip and use protective equipment such as gloves and safety glasses.
4. Stand to the Side When Releasing or Winding Springs
Never stand directly in front of springs or winding bars.
- Position yourself to the side to reduce the risk of being struck if something slips or breaks unexpectedly.
5. If Inexperienced, Do Not Proceed
Spring repair is not a DIY-friendly job unless you’re professionally trained.
- If you feel uncertain, stop immediately and contact a certified garage door technician.
- The cost of professional help is far less than the cost of an emergency room visit.
How to Change Torsion Garage Door Springs
1. Disconnect Power and Secure the Door
Begin by turning off the power to your garage door opener to eliminate any chance of accidental activation while working. Unplug the opener from the outlet. Next, clamp the garage door to the track using locking pliers or C-clamps just above the rollers on both sides. This will prevent the door from moving unexpectedly while the springs are replaced.
2. Mark Spring Placement on the Torsion Shaft
Before removing the old springs, use a piece of chalk or a permanent marker to mark the current position of the spring on the torsion shaft. This helps ensure proper alignment when installing the new springs. Also, note the number of turns or coils if known.
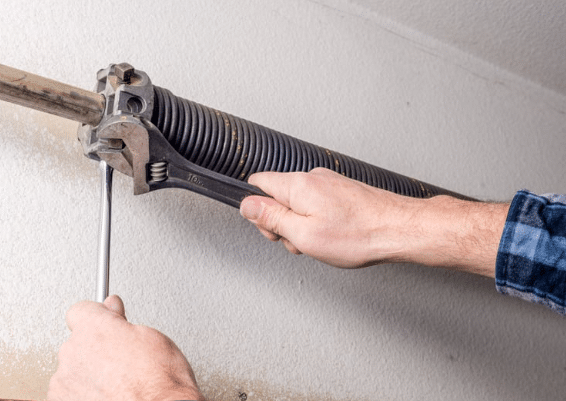
3. Release Spring Tension Carefully
Insert a properly sized winding bar into one of the holes on the winding cone of the spring. Hold the bar firmly and loosen the set screws with a wrench. Insert the second winding bar into the next hole to keep control of the tension as it is slowly released. Alternate between the two bars to gradually unwind the spring. This step must be done with extreme caution, as the springs are under high tension and can cause serious injury if mishandled.
4. Remove the Old Spring
Once the tension is fully released, remove the set screws completely. Carefully slide the old spring off the torsion shaft. If necessary, also remove the center bearing plate and the cable drums on either side to access and remove the entire spring assembly.
5. Install the New Spring
Slide the new torsion spring onto the shaft, ensuring the winding cone is facing the correct direction for your garage door configuration (right-wound or left-wound spring, depending on the side). Reinstall the center bearing and cable drums if they were removed. Position the new spring to align with the original markings or placement.
6. Secure and Wind the New Spring
Tighten the set screws on the winding cone to secure the spring to the torsion shaft. Begin winding the spring using winding bars, turning in the appropriate direction based on the spring’s orientation and the required number of turns (usually indicated by the spring manufacturer). Count each quarter turn carefully and stop when the correct tension is achieved.
7. Final Checks and Testing
Double-check all hardware to ensure it is tight and properly secured. Remove the clamps or locking pliers from the garage door tracks. Reconnect the garage door opener to the power source. Carefully test the door manually at first, lifting it slowly to make sure it opens smoothly and stays in place when lifted halfway. Then test it using the opener to confirm it operates correctly.
Important Note:
Replacing torsion springs is a dangerous task that involves significant risk. If you are not experienced or comfortable with this type of repair, hiring a professional garage door technician is highly recommended to perform the replacement safely.
How to Change Extension Garage Door Springs
Changing extension springs on a garage door is a task that a careful DIYer can complete, but it still involves potential hazards. Always take safety precautions seriously. Here’s a step-by-step guide to help you replace extension springs safely and effectively:
Open the Garage Door Fully
Begin by opening the garage door all the way until it’s in the fully raised position. This reduces the tension in the extension springs, making the replacement process safer. Once the door is fully open, place C-clamps or locking pliers tightly just below the bottom rollers on both tracks. This prevents the door from accidentally closing while you’re working.
Disconnect the Safety Cable
Locate the safety cable that runs through the center of the extension spring. Carefully disconnect it from the anchor point—usually a bolt or hook at the end of the track. Keep track of all hardware, as you’ll need it when installing the new spring.
Remove the Old Extension Spring
With the door secured and the safety cable removed, unhook the worn or broken spring from the support bracket and track. Extension springs typically hook into an eye bolt or bracket at both ends, so depending on how they’re secured, you may need to use pliers or a wrench.
Install the New Extension Spring
Before installing, double-check that the new spring matches the old one in both length and tension rating. Using the wrong spring can damage your garage door or create a dangerous imbalance. Hook the new spring into place using the same anchor points where the old one was attached.
Reconnect the Safety Cable
Thread the safety cable through the center of the new spring, just like it was in the old setup. Reattach the cable securely to its anchor point. This cable helps prevent the spring from flying loose if it breaks in the future, providing a critical layer of safety.
Remove C-Clamps and Test the Door
Once everything is installed and secured, remove the C-clamps from the tracks. Slowly lower the garage door and raise it again to test the balance and tension. The door should open and close smoothly and stay partially open on its own without assistance. The spring tension may be incorrect if the door slams shut or doesn’t stay up.
Important Safety Warning:
While extension springs are generally easier to replace than torsion springs, they can still cause serious injury if not handled properly. Always wear safety glasses and gloves, and exercise extreme caution throughout the process. If you are unsure or uncomfortable at any point, it’s strongly recommended that you contact a professional garage door technician.
Frequently Asked Questions
What happens if you put the wrong spring on a garage door?
Using the wrong spring can cause the door to be unbalanced, making it difficult or unsafe to open. It can also strain the opener and other parts, leading to faster wear or possible damage.
Which way to wind a garage door spring?
Torsion springs are wound in the opposite direction of how the door turns. For right-hand wound springs, you wind them clockwise; for left-hand wound springs, you wind them counterclockwise.
How many times should you wind a garage door spring?
Typically, a garage door spring is wound about 30 to 36 quarter turns, which equals 7.5 to 9 full turns, depending on the door’s height. Always follow the manufacturer’s instructions for your specific door and spring size.
How do you tell the difference between a left-hand and right-hand wound spring?
Look at the end of the spring where the coils are wound. If the coils slope upward to the left, it’s a left-hand wound spring; if they slope upward to the right, it’s a right-hand wound spring.
Conclusion
Changing garage door springs at home is not a beginner-level DIY task. While it can be done safely with proper preparation and tools, many homeowners choose professional help to avoid injury and ensure proper function.
This guide provides a step-by-step approach on how to change garage door springs, but always evaluate whether the risks outweigh the potential savings. Safety is the most important factor.
BSD Garage Doors offers trusted, affordable, expert spring replacement services across Naperville and surrounding areas. If you’re unsure about doing it yourself, we’re ready to help.
End Note
BSD Garage Doors is your reliable garage door spring repair and replacement partner. Our team uses high-quality parts and precision techniques to ensure lasting performance and safety.
Visit BSD Garage Doors to learn more about our services. Explore our company values on our About Us page, and check out our repair services in Naperville or spring replacement and installation options.
We also serve Chicago, IL, and other local service areas. For pricing details, visit our prices page. Stay connected through Facebook, Twitter, and LinkedIn, or use our online booking system to schedule your appointment.
BSD Garage Door, LLC
955 West 75th Street, Naperville, IL, 60565, United States
+16305181962