Want to know how to change garage door torsion springs correctly? Use this easy-to-follow, safety-first guide with practical advice.
Torsion springs are one of the most dangerous components of a garage door system. They store massive amounts of tension to counterbalance the door’s weight. When these springs wear out or snap, replacing them is a technical and risky process.
Learning how to properly change garage door torsion springs involves more than just having the right tools. You must understand how spring tension works, know the correct winding technique, and apply the appropriate safety measures to prevent injury.
If you’re comfortable with hands-on tasks and have a knack for mechanics, this guide outlines all the essential steps. But if you’re unsure, it’s wiser to call a professional like BSD Garage Doors for a safer option.
What Are Garage Door Torsion Springs?
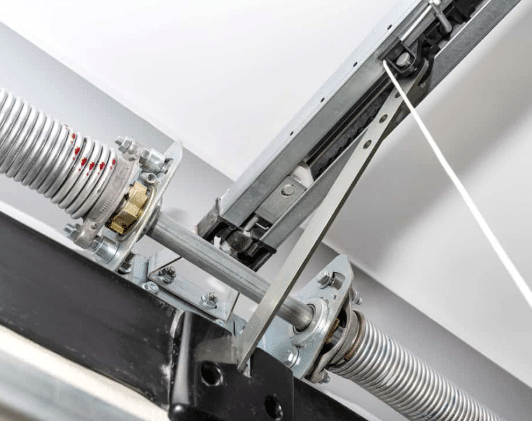
Garage door torsion springs are essential components in the operation of modern garage doors. Located horizontally above the garage door opening, these tightly wound metal springs play a critical role in safely and efficiently lifting and lowering the door.
When the garage door opens or closes, the torsion springs twist on a metal shaft, storing and releasing energy to counterbalance the door’s weight. This process reduces the strain on your garage door opener and allows for smoother, more controlled movement. Without functioning torsion springs, your garage door would be extremely difficult—and potentially dangerous—to operate.
Why Do Garage Door Torsion Springs Break?
Torsion springs are built to handle a specific number of open-and-close cycles, typically between 10,000 and 20,000. Over time, this constant stress causes the metal to weaken and eventually fail. Temperature changes, poor maintenance, and improper spring size can also contribute to early wear.
Common Signs You Need to Replace Garage Door Torsion Springs
Recognizing the early signs of a failing torsion spring can prevent costly garage door repairs and ensure your door remains safe. Here are some key indicators that it may be time to replace your garage door torsion springs:
- Garage door won’t open or is very heavy: If your garage door suddenly becomes too heavy to lift manually or won’t open with the opener, a broken torsion spring could be the cause.
- Loud snapping or banging noise: A loud sound from the garage, like a gunshot or snap, often signals that a torsion spring has broken.
- Visible gap in the spring coil: A clear break or gap in the spring is a surefire sign it needs replacement.
- Door slams shut or moves unevenly: This may indicate uneven tension or a broken spring on one side of the door.
Tools You’ll Need to Change Garage Door Torsion Springs
Before starting, gather the following tools:
- Two steel winding bars (never use screwdrivers)
- Locking pliers or C-clamps
- 7/16″ and 1/2″ wrenches or sockets
- Safety goggles and leather gloves
- Step ladder
- Chalk or marker
Proper tools are non-negotiable when working with high-tension components.
Safety Precautions Before You Begin
Replacing garage door torsion springs involves working with tightly wound metal components that can release dangerous amounts of force if mishandled. Carefully review these safety measures before attempting the job to protect yourself and others.
Unplug the Garage Door Opener
Start by disconnecting the garage door opener from its power source. This prevents any accidental activation of the opener while you’re working. Even a brief activation could cause the door to move unexpectedly, which can be extremely dangerous if you’re handling the spring or cables at the time.
Clamp the Door to the Track
Once the door is closed, use C-clamps or locking pliers to secure the door to the tracks above the bottom rollers on each side. This will keep the door from moving upward during spring removal or installation. Movement during this process could cause loss of control, damage to the door, or injury.
Stand to the Side While Working with Springs
Always position your body to the side when releasing or applying tension to the torsion springs. Never stand directly in front of the spring or the winding bars. This minimizes the chance of being struck if a spring or tool slips unexpectedly. Always be aware of where your hands, face, and body are in relation to the spring system.
Use Only the Proper Tools
Do not substitute tools. You must use high-quality, properly sized winding bars that fit the holes in the winding cone. Improvised tools like screwdrivers or pliers are dangerous and can easily slip out, causing loss of control and serious injury. Winding bars are designed to give you the leverage and security to safely handle spring tension.
Wear Gloves and Eye Protection at All Times
Personal protective equipment is essential. Wear durable work gloves to protect your hands from cuts, pinches, or contact with sharp metal. Use safety goggles or impact-rated eyewear to protect your eyes from potential flying debris or accidental spring snapback.
Do Not Work Alone
Even if the other person isn’t assisting directly, someone should be nearby to offer help or call for emergency services. A second person can also hand you tools, watch cable tension, or alert you if something looks off. Never attempt spring replacement entirely alone.
Understanding how to change garage door torsion springs includes knowing when to stop and call a professional.
Know When to Call a Professional

It’s essential to recognize your limits. If you’re uncertain about any step, or if parts appear damaged, rusted, or unfamiliar, stop and consult a trained garage door technician. Professional help is strongly recommended if the door seems unusually heavy, out of balance, or if you have a two-spring system that is not easily accessible.
Step-by-Step Guide: How to Change Garage Door Torsion Springs
Torsion springs are under extreme tension and can cause serious injury if improperly handled. If you’re unsure about any part of this process, consider hiring a professional.
Step 1: Secure the Garage Door
Before starting any work, safety should be your top priority:
- Unplug the garage door opener to ensure the door can’t move unexpectedly.
- Fully close the garage door. If your door won’t close all the way, do not proceed.
- Place C-clamps or locking pliers firmly onto the tracks just above the rollers. This will keep the door locked in place and prevent it from accidentally opening while you’re working on the springs.
Step 2: Mark the Shaft and Cable Drums
Marking the original positions of the hardware will help during reassembly:
- Draw reference lines across the torsion shaft and on each cable drum using chalk, a permanent marker, or paint.
- These marks will ensure everything is realigned correctly later, maintaining balance and correct operation.
Step 3: Release Spring Tension
This is the most dangerous step—proceed with extreme caution:
- Insert a winding bar (not a screwdriver) into one of the holes on the winding cone of the spring.
- Hold the bar firmly and keep your body to the side, out of the potential path of the bar.
- While holding the first bar, use a wrench to loosen the two set screws on the winding cone.
- Slowly unwind the spring, using a second winding bar to move one quarter-turn at a time. Always keep one bar inserted for control.
Repeat until all tension is fully released. Double-check that the spring is fully unwound before proceeding.
Step 4: Remove the Old Spring
Once the tension is fully released:
- Slide the loosened spring toward the center support bracket (usually located above the garage door).
- Disconnect the spring from the bracket and slide it off the torsion bar.
- Pay attention to the orientation of the spring, which side it was on, and the direction of the wind (left-wound or right-wound) to match with the new one.
Step 5: Install the New Spring
Now you’re ready to install the replacement spring:
- Slide the new torsion spring onto the shaft in the same position and direction as the old one.
- Ensure the winding cone is on the correct side of the shaft (left-wound on the right side of the center bracket, and vice versa).
- Reattach the spring to the center bracket and tighten the set screws securely.
Step 6: Wind the New Spring
Winding the spring correctly is essential for proper door function:
- Refer to the manufacturer’s instructions or a torsion spring chart to determine the number of turns required based on your garage door size and weight.
- Use your winding bars again to apply tension: insert the bar and rotate one-quarter turn at a time.
- Count each quarter turn until you reach the proper number.
- After winding, tighten the set screws on the winding cone securely.
Step 7: Tighten and Reconnect Everything
Final steps to wrap up the process:
- Reattach the cable drums and ensure the lift cables are correctly seated in the grooves.
- Align the drums with your chalk marks and tighten the drum set screws.
- Remove the C-clamps or locking pliers from the tracks.
- Plug in the garage door opener and test the door operation several times, watching for smooth, balanced movement.
- If the door doesn’t stay in place halfway open or feels unbalanced, adjust the tension as needed.
Final Safety Check:
- Double-check all fasteners and set screws.
- Ensure both sides are evenly tensioned.
- If anything seems off, stop and reassess—an unbalanced door can damage the opener or cause injury.
Frequently Asked Questions
How do I know which garage torsion spring I need?
You’ll need to measure the spring’s length, inside diameter, and wire size, and determine whether it’s left-hand or right-hand wound. For an exact match, consult your garage door’s model number or a professional.
How do you know if your garage door torsion spring is bad?
Signs of a bad spring include a heavy door, opening unevenly, or not staying open. You might also hear a loud snap or notice a visible break or gap in the spring.
Can I open my garage door if the torsion spring is broken?
It’s possible to open the door manually, but it will be very heavy and dangerous without the spring’s support. It’s strongly recommended to avoid using the door and call a professional to replace the spring.
Do garage door torsion springs need lubrication?
Yes, torsion springs should be lubricated every 6 to 12 months with a silicone-based or garage door lubricant. Proper lubrication helps reduce noise and wear, extending the life of the springs.
Conclusion
Understanding how to change garage door torsion springs is a valuable skill for seasoned DIYers, but it’s not for everyone. The job is doable with the right tools, preparation, and safety measures, but the risks are high.
If you’re unsure about any part of the process, investing in a professional service is better. BSD Garage Doors delivers fast, precise, and guaranteed torsion spring replacement for long-term reliability and safety.
Choose peace of mind over trial and error. Your garage door is one of the largest moving parts in your home—trust it to trained experts.
End Note
BSD Garage Doors is your go-to provider for professional garage door spring repair and installation. Our technicians are trained to handle high-tension torsion systems with precision and care.
Visit our About Us page to see what sets us apart. We serve Naperville, Barrington, and other service areas.
Explore our installation services, repair solutions, and full range of services in Naperville. See our price list for clear estimates. Stay in touch on Facebook, Twitter, and LinkedIn. When you’re ready, book your appointment online.
BSD Garage Door, LLC
955 West 75th Street, Naperville, IL, 60565, United States
+16305181962